Feb 28, 2012

A good, free partition tool to resize and merge Windows partitions - EaseUS Partition Master

The other day I ran into an issue where a customer was getting a warning that the C:\ drive was full on their somewhat new Dell Inspiron laptop.  Turns out that for some reason the factory had partitioned the drive into a 60GB C:\ drive and a 180GB D:\ drive.  So there C:\ drive WAS nearly full but they had plenty of space available on D:\.  They didn't have any personal files on D:\, it just looked like various folders created by the system.

So what I wanted to do was allocate some of that free space on D:\ and make use of it on C:\.  I could have possibly deleted the D:\ partition but that may have caused some issues since the system was obviously writing some things there already.  Alternatively I could have tried to redirect the users folders (documents, pictures, music, etc.) to the D:\ drive but I needed to keep this particular laptop very simple and I didn't want to confuse matters with some files being stored on a different drive, etc.

I decided that what I really wanted to do was to shrink the massive D:\ drive down and then allocate that free space to the C:\ drive.  I wasn't sure if I could do that with the built in disk management tools in Windows 7 but I wanted to give it a try.  I first went into Disk Manager, found the primary disk, right-clicked on the D:\ partition and I WAS able to shrink it. Sweet.  Now it showed a big block of unallocated space to the right of D:\.  I now wanted to expand C: but when I right-clicked on C:\, all of those options were grayed out.

After some research, I found that Windows 7 Disk Management will only allow you to expand a partition into unallocated space if the free space is sitting to the immediate right of the current partition.  Currently my disk map looked like this - System Partition -> C: -> D: -> Unallocated Space.

I found some recommendations to try out EaseUS Partition Master free home edition. It has several features including merging and resizing partitions.  You can see some screenshots here.  Basically you can drag some handles to resize your partitions. Initially I ended up in the same stuck situation. I dragged the handles to shrink my D:\ drive but I ended up with unallocated space to the right of the D:\ drive and this tool was still unable to either expand C:\ into the free space or merge C:\ and the free space.  I discovered that it has the same limitation that it can only grow a partition into unallocated space if that space is immediately to the right of the partition.

However once I figured this out, it was very easy to work around it.  Partition Master lets you shrink the partitions from either the right side OR the left side (keep picturing the disc map in your head).  I tried again to resize my D:\ drive but this time, I grabbed the handle on the left side and dragged it to the right. See screenshot below...
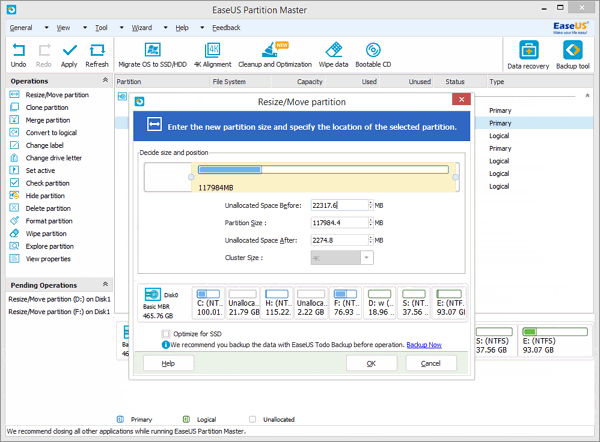


Since I did the D:\ resizing by dragging from the right to the left, this actually created unallocated space IN BETWEEN C: and D:, meaning that I should now be able to expand C: finally!

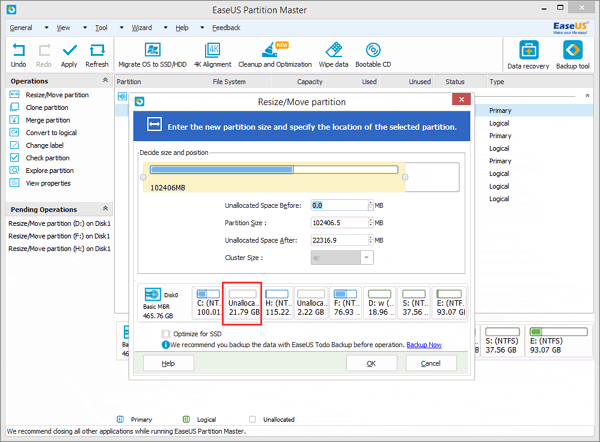
The screenshot below shows the user grabbing the handle on the C: partition and dragging it to the right, to expand the partition into the free space.  (After each of these resizing operations, it does need to reboot and it does all of the disk-related tasks in a special boot environment. This process was pretty quick in my case. Maybe 20 minutes.)  I now had plenty of room on the 180GB C: partition.

 
So definitely check out EaseUS Partition Master if you need a simple tool to work with Windows 7 partitions and the built in Disk Manager isn't working for you.

Feb 20, 2012

Test post from Blogger app for iPhone

Just trying out the Blogger iPhone app. Seems pretty basic. I don't see any way to format text or add a hyperlink. But you can add pictures from your iPhone photo library. And you can add labels/tags to the post.


iPhone or iPad App Store list of updates aren't visible. Screen is blank. Can't install updates.

Sometimes when I launch the App Store app on my iPhone 4 with iOS 5.0.1, I'll get the little red indicator showing that there are updates available for my apps on the Updates tab but when I go to that tab, the screen is blank. It doesn't show the updates.

I haven't found a really good fix yet but for a workaround, I just hit the home button to close the Apps Store app and then double-click the home button to pull up the task bar that shows the currently running apps.

You should see App Store sitting there since you just opened it. Press and hold on the icon for App Store. It will start to jiggle and you'll see a red circle with a minus sign.  Click on the red circle. This will kill the App Store app.  Now hit home again to stop the jiggling. Hit home one more time to return to the regular screen.  Now launch the App Store app and you should see your available updates and should be able to install them.

iTunes error "This computer is no longer authorized for apps that are installed on the iPhone. Would you like to authorize this computer for items purchased from the iTunes Store?"

I ran into this issue with my iPhone 4 running IOS 5.0.1.  I plugged my iPhone into my Windows 7 PC to sync with iTunes and half way through the sync process a message popped up and said "This computer is no longer authorized for apps that are installed on the iPhone "Jason's iPhone". Would you like to authorize this computer for items purchased from the iTunes Store?"  Then it says "If you do not authorize this computer, the app E*Trade Mobile" (and 3 other apps) and it's data will be deleted from this iPhone."

Then is gives me buttons for Authorize, Don't Authorize or Cancel.   I didn't want to simply hit Authorize, because as you may know, you are only allowed to have 5 computers authorized for any particular iTunes account.  And since this was the only PC that I use iTunes on, something was clearly wrong and I didn't want to waste one of my authorizations.  I'd rather fix the actual problem.  So I hit the Cancel button on the error.

You could first have a look at this article from Apple, but it didn't really help in my case.  http://support.apple.com/kb/TS1389

My guess is that it is related to the fact that I ended up with two different iTunes accounts because I was a Mobile Me customer.  I've had an iTunes account for a couple years and then I signed up for Mobile Me account (the predicesor to iCloud) and created a new account with an @me.com address.   Then when Mobile Me merged into iCloud last year, the @me.com account also became an iTunes account.  So now I've got two iTunes accounts and Apple doesn't provide any way to merge these into one.

So it turns out that I had downloaded a few apps onto my iPhone using the @me.com account without really thinking about the consequences.  It looks like this decision is finally catching up to me.

So I went back to my iPhone and deleted the first app that the error mentioned - E*Trade Mobile.  Then I started the sync process again in iTunes. The same error came up and mentioned a different app this time, because E*Trade Mobile was gone.  I hit Cancel again and then deleted the app that it mentioned from my iPhone. I repeated this process 4 more times until I had deleted all of the apps on my phone that were mentioned in the error message. I'm assuming these were the few apps I had downloaded to the iPhone using the @me.com account instead of my normal iTunes account.

Then it was able to sync without any issues. And I had made a list of the apps that I deleted so I simply re-installed them using the proper iTunes account.

 If this post helped you out, it would be great if you would click on an ad or two. Thanks!!

iPad or iPhone home button becomes sluggish or doesn't respond. How to fix!

I read a tip the other day that is suppose to restore "home" button on your iPhone, iPad, or iPod Touch back to normal working condition, should it ever become hard to press or slow to respond to your double-clicks, etc.


  1. Launch an Apple default app such as the "Stocks" app.
  2. Hold in the power button on the top edge of your device until you see the "Slide to power off" screen. Then let go of the power button.
  3. Now hold down the home button and it will kill the Stocks app and the "Slide to power off" screen will disappear.
Apparently this is supposed to somehow reset or re-calibrate the home button.  My home button was already working fine so I can't say if it works or not. Though many other folks have said that this DOES work.  Let me know!

Jan 24, 2012

Office 365 password expired - How to disable 90 day password expiration

I ran into an issue with my first Microsoft Office 365 cloud hosted deployment.  I went to go log in as the administrator to work on an issue and I found that my password had expired.  I then discovered that by default, all user passwords are set to expire every 90 days.  If you don't want such a policy, it IS possible to disable.  Though you won't find the settings anywhere in the Admin portal GUI.  You'll need to use some PowerShell scripts.

You'll need a few tools installed on your workstation in order to get Powershell working.

Microsoft Online Services Sign-In Assistant

32-bit download
64-bit download

Microsoft Online Services Module for Windows PowerShell


32-bit download
64-bit download

Now that you have the tools in place, launch PowerShell but going to Start -> All Programs -> Microsoft Online Services -> Microsoft Online Services Module for Windows PowerShell.

Now to you need connect and log in to your Office 365 account with PowerShell.  Type the following command in the PowerShell window...

Connect-MsolService


Then you'll see a login window. Enter your Office 365 username and password.

Now you can disable the password expiration for all users in your Office 365 domain with this command...

Get-MSOLUser | Set-MsolUser -PasswordNeverExpires $true


If you'd like to make the change for just a single user, you can use the script below (replacing user@mydomain.com with the proper user's email address.)

Set-MsolUser -UserPrincipalName user@mydomain.com -PasswordNeverExpires $true


You won't get any confirmation or anything, but as long as PowerShell doesn't give you an error, then you've done it correct.

Update : One important thing I've discovered is that this script doesn't disable the password expiration for the entire system once and for all - it's only disabling it for the user(s) that you specify that exist right now.  So if you create a new user tomorrow, I believe that users password will expire in 90 days by default.  So you'll need to run this script each time you create a new user account!

Sep 23, 2011

Transferring my Blogger.com blog and custom domain to GoDaddy for hosting and dns management

I've just transfer my custom domain over to GoDaddy to do my DNS and domain management there.  Since I no longer had a hosting plan with HostGator, only a domain management plan, it seems they would not allow me to add custom A records to my domain, which is critical to getting Blogger to work with a custom domain.

So I signed up at GoDaddy and initiated the domain transfer. It wasn't too painful. Clicking on some confirmation emails, entering some keys that were emailed to me to verify that I owned the email account associated with the domain, unlocking my domain at HostGator, talk to HostGator chat support and getting them to send me an authorization code to approve the transfer.  Then I just had to wait a day or two until I received an email from HostGator saying the domain was ready to be transferred and asking me to click a button to approve it.

Once I got the domain into the GoDaddy system, I went to the Domain Manager, selected my domain and hit the Namersevers button. I told it I wanted to "park" my domain and use all of the default GoDaddy nameservers.  

Then I went to DNS Manager and clicked on Edit Zones under my domain name. Here is where you enter your custom A records. Just hit the Quick Add button in the "A (host)" section and add these records...

yourdomain.com    216.239.32.21
yourdomain.com    216.239.34.21
yourdomain.com    216.239.36.21
yourdomain.com    216.239.38.21 

Then go down to the CName (Alias) section and add the following record...

www   ghs.google.com

In my case, I already had a www record there that was setup by default. I'm not positive but I thought that might cause I problem so I deleted the other WWW record.  Might cause problems if you had the same subdomain pointing to two different destinations.

So then you just go back into your Blogger settings, switch your publishing destination to be your *.blogspot.com address for a moment, save settings, switch back to custom domain (advanced settings) and enter in your full domain name - www.jasonhartman.net.    Then you can also check the box that says to redirect the naked domain to the full domain name with WWW.    My blog is now working fine, with and without WWW in the address.

I initially had some problems because I went into GoDaddy first before I started the actual domain transfer and set some Offsite DNS settings and indicated that this domain soon would be transferred to GoDaddy. But it seems that it didn't transfer in correctly, because the Domain Manager showed my domain name twice - one of them said (Pending Transfer).  So I just deleted that one and started off with the new clean domain and all the default settings for DNS stuff.

I think this issue also lead to some other early problems trying to get my email account and email forwarding accounts working.  After I would create an email account, the status of the account would change to "Pending setup: validating MX record" and never seemed to leave that status, even if it was just a forwarding account to bounce my mail to another server.  But once I got rid of the bad domain, parked the new domain and reset all of the nameservers to the defaults, I could create email accounts and email forwarders with no problems.  

Autopilot White Glove error message We couldn't find any Provisioning Packages

I was testing out the Windows Autopilot "White Glove" feature this week.  This is a new feature of the Intune AutoPilot service th...