I'm using an installation of Windows 8 Enterprise 64bit from TechNet. I finally got around to activating my software and I received the following error message - "Code: 0x8007007B Description: The filename, directory name, or volume label syntax is incorrect."
It turns out the issue is pretty simple. There is a default license key that is baked into the software, you just need to change that key and input your key that you got from TechNet, MSDN, etc. and then activate it with that key in place.
1. Pull up the "Run" dialog box
2. Enter "SLUI 3" (no quotes)
3. Enter your true license key in the window that pops up
4. Hit "Activate" button and you are done!
Nov 27, 2012
Windows 8 is fast on an SSD drive - installation, boot time, start time, shutdown time (OCZ Vertex 4)
So I bought myself an early Christmas present. I got a great Black Friday deal on an OCZ Vertex 4 512GB SSD (solid state drive). One of the top rated SSD's at the moment. This was going into my laptop - a 3 year old HP Pavilion DV7 - Core i7 with 8GB of RAM.
I then installed a fresh build of Windows 8 Enterprise as part of this project. I had the Windows 8 ISO file extracted to a USB stick for installation to help speed up the process.
I know SSD's are blazing fast and I know Windows 8 has a ton of performance enhancements so I was really anxious to see how the pair would perform together. I was not disappointed!
It look less than 5 minutes to install Windows 8!! I still had some setup questions to answer - selection of my wifi network, etc but the actually installation part was already done. Wow!
Here are some other numbers for you...
Start up time to login screen - 15 seconds
Full reboot to login screen - 25 seconds
Shutdown time - 8 seconds
Sleep - 3 seconds
Wake - 1 second!
Fix "No Program Name" with FIOS DVR STB channel guide when channel information is missing. Especially in a bridged configuration.
This isn't really "IT" related but I thought I'd post this here anyway in case it might help someone out of a jam. I'm a FIOS customer and my setup is slightly unusual in that I have a "bridged" network setup - meaning I have my standard FIOS router/cable modem as well as a Linksys Wireless N router bridged together.
As a result, about once a month or so, I lose my channel guide on my FIOS cable boxes for some reason. The title of all of the shows says "No Program Name". So what I need to do is login to my FIOS router and restart a particular network connection. This always fixes it in MY case, your mileage my vary. I'd suggest first simply rebooting your FIOS router to see if that helps. If not, give these steps a try...
1. Enter the IP address of your FIOS router into your web browser and then login with your username and password.
2. Click on the "My Network" icon at the top of the page.
3. Click on "Network Connections" on the menu on the left side
4. Scroll down to underneath of the "Bridge" section and click on "Broadband Connection (Ethernet)"
5. On the next page, I always see a button at the top that says "Enable" (because mine has been disconnected or disabled) so click on that button if you see it.
6. Click "Apply" on the bottom of the page.
7. Wait maybe 20-30 minutes and your channel guide should be populated again.
Let me know if this works for you.
Sep 11, 2012
Add or link your SharePoint calendar to Outlook so you can view it in Outlook client using "Connect to Outlook" feature
One cool feature of a SharePoint calendar is that you can add it to your local Outlook application and view your SharePoint calendars right along side your normal personal calender. This may work in other versions but my example is dealing specifically with Outlook 2010 and SharePoint Online (as part of Office 365).
1. Login to your SharePoint website and locate the name of the calendar you would like to add to Outlook. In my case, it's called "Team Calendar". Click on the name to pull up that calendar.


1. Login to your SharePoint website and locate the name of the calendar you would like to add to Outlook. In my case, it's called "Team Calendar". Click on the name to pull up that calendar.
2. Now on the SharePoint toolbar, there is a section called "Calendar Tools" with a tab called "Calendar". Click on that tab.
3. Next click on the button that says "Connect to Outlook". You'll probably see one or two prompts popup that will ask that you want to confirm this action.
4. After you've confirmed the prompts, you'll now see your calendar has been added to Outlook. You can use the checkboxes to turn on and off various calendars, depending on how many you want to see at a time. You can fully interact with this SharePoint calendar - add/edit/delete appointments, drag and drop between your other personal calendars, etc.
Where to find the email signature setup window in Outlook 2010 to add a new signature
Most people are familiar with HOW to create a "signature" in Outlook but sometimes it can be hard to find WHERE to setup a signature in a new version of Outlook.
Here are the steps to help you find the signature setup window in Outlook 2010.
1. First, click the "File" tab in the upper left corner of Outlook.


4. Finally click on the "Signatures..." buttton

Now you can start creating your email signature!
Here are the steps to help you find the signature setup window in Outlook 2010.
1. First, click the "File" tab in the upper left corner of Outlook.
2. Then click on "Options"
3. Then click on "Mail"
Now you can start creating your email signature!
Adding multiple contacts to Lync Online in Office 365 using distribution groups since there is no import tool
One headache that I ran into early on with Microsoft Office 365 (hosted Exchange, SharePoint and Lync) is that your Lync client is completely empty when you start deploying your software. I assumed it would automatically pull in all of your Office 365 user accounts and pre-populate them as contacts. No such luck.
Also there doesn't seem to be any sort of "import" feature in Lync where you could pull in contacts from an Excel sheet or Outlook list. So that leaves you having to manually add all of your employees as contacts on each Lync workstation. No thank you!
So what I typically do is create a distribution list or two in the Office 365 portal. Then you can just add that whole group to Lync all at once.
So first, login to your Office 365 portal with an admin account. Under the "Exchange" section, click on "Manage". Then go to the "Distribution Groups" tab. Now click on "New..". Now you can give your group a name (such as "Office Staff", "Sales", "Service", "All Users", etc.). Then scroll down to the Membership area and hit "+ Add..." to begin adding your Office 365 users to this group. When you are finished, hit "Save". You'll now see your new distribution group listed on this page.
You may not be able to add this group to Lync immediately. It could take a few hours for everything to update in the cloud. But after some time has passed, you'll be able to go into your Lync client and in the "Find a contact" field, enter in the name of your distribution group ("Office Staff, Sales, etc."). Once it finds the group, you can just hit the "+" symbol or right-click and "Add to Contacts". Once the group shows up in Lync, you simply hit the little triangle indicator next to the group name to expand it and show you all of the individual members of that group. So now you only need to add one or two groups on each Lync client that you install, rather than manually adding every user.
One awesome perk of using this method is that now you can control and update the contact lists from a central location. If you get a new employee or if someone leaves, you just go back into your distribution group settings and make the changes and just wait for them to propagate out to the clients. You don't need to have the users manually adding or deleting contacts.
Jul 16, 2012
iPhone or iPad getting slow? Make sure you aren't too low on storage space!
My iPhone 4 had been getting rather slow lately - sluggishly opening apps or switching between apps. Then I noticed that my storage space was really low! To check, go to Settings->General->Usage. It will show you the overall space available and then after a minute or two, it'll show a breakdown by app, so you can see which apps are taking up the most space.
In my case, my 32GB iPhone had roughly 300MB's of free space remaining! That's very low! So I got rid of a bunch of apps that I wasn't using and I discovered one of my podcast players was keeping several gigs of old shows even though they should have already been deleted.
Now I have close to 7GB of free space and it feels like my iPhone has gotten a little bit faster and more responsive. YMMV. I know at least in the PC world, if your hard drive is nearly full, you'll run into all sorts of performance issues and other strange errors so I would imagine it's similar in iOS devices.
iTunes has found purchased items on the iPhone that are not present in your iTunes library
My iPhone was running low on space the other day (less than 1GB free and it was starting to get slow and sluggish) so I wanted to do a little house-keeping and delete some stuff that I no longer needed. I actually had the iPhone plugged into my PC at the time and I was going through and deleting app using iTunes, rather than directly on the iPhone. (Sometime when you delete an app from your phone, it will still remain in iTunes.)
So after I deleted a bunch of apps, i hit the Sync button in iTunes. Then this error/warning message popped up. "iTunes has found purchased items on the iPhone "Jason's iPhone" that are not present in your iTunes library. Do you want to transfer these items from this iPhone back to your iTunes library? If you do not transfer these purchased items to your iTunes library, they will be removed from the iPhone."

So it's saying, "Hey, you have things on your phone that aren't in iTunes - do you want me to copy them from the phone back into to iTunes so you don't lose them?" But in this case, NO, it didn't want to do that. I was trying to delete apps from iTunes AND my iPhone. So I hit "Don't Transfer". Now the apps that I had deleted in iTunes were also deleted from my iPhone and I was able to free up a good bit of space. And my phone seems to be operating a little quicker too - I was down to a few hundred MB of free space and now I have several GB free.
So after I deleted a bunch of apps, i hit the Sync button in iTunes. Then this error/warning message popped up. "iTunes has found purchased items on the iPhone "Jason's iPhone" that are not present in your iTunes library. Do you want to transfer these items from this iPhone back to your iTunes library? If you do not transfer these purchased items to your iTunes library, they will be removed from the iPhone."
So it's saying, "Hey, you have things on your phone that aren't in iTunes - do you want me to copy them from the phone back into to iTunes so you don't lose them?" But in this case, NO, it didn't want to do that. I was trying to delete apps from iTunes AND my iPhone. So I hit "Don't Transfer". Now the apps that I had deleted in iTunes were also deleted from my iPhone and I was able to free up a good bit of space. And my phone seems to be operating a little quicker too - I was down to a few hundred MB of free space and now I have several GB free.
Jun 21, 2012
Shared team calendar appointments not syncing from Outlook to SharePoint
I've ran into this issue a couple of times with various implementations of Microsoft Office 365 (hosted Exchange, Lync, and SharePoint). We've setup a team calendar on the SharePoint site and used the "Connect to Outlook" button to add that calendar to the users Outlook profile so that they can see their personal calendar side-by-side with the shared team calendar.
The user is happily going along adding appointments in Outlook to the shared team calendar but then they realize that nobody else is seeing these appointments on their shared calendar in Outlook. A quick check of the actual calendar in SharePoint shows that the appointments never actually made it from Outlook to SharePoint, which explains why they aren't syncing to any other users.
I'm not sure how to permanently fix this or prevent it from happening in the first place, but the quick fix is to just close out of Outlook for a few seconds and then launch it again. Then all of the appointments you added to the shared team calendar in Outlook should sync up to the SharePoint calendar and then all of the other users will be able to see those appointments in Outlook as well.
Update : Also, make sure that you are properly logged into Office 365 (or SharePoint Online) when you are launching Outlook. I've seen some situations where the Office 365 login window pops up but users just click away from it, rather than clicking on their email address, re-entering their password and clicking Sign In. In fairness, that Office 365 sign-in window doesn't make it real clear what the user needs to do. It's not obvious that the user profile picture and email address area is actually a button to click on. If you aren't logged into Office 365, then you can still add appointments into your Team Calendar via Outlook but they won't actually publish to SharePoint until you authenticate.
Jun 19, 2012
Windows 7 PC won't Sleep automatically - An audio stream is currently in use
My Windows 7 64 bit PC (A Dell XPS 420) had been working just fine with sleep mode - going to Sleep after the specified period of time, waking with no problems, even waking automatically for my Windows Home Server backups.

But recently it would not automatically go to sleep. I did swap out some different hard drives recently but nothing that should have messed with the BIOS or Sleep settings. So I've been troubleshoot this issue quite a bit. I did find a nice checklist of things on this page. I'd suggest going over those basic tasks first. However mine was a little more complicated.
First, launch a Command Prompt window using the "Run as administrator" option. (Search for "cmd", right-click and select "Run as administrator".)
Then run this command: powercfg -requests
What this will do is tell you any programs or devices that are currently preventing the system from entering sleep mode. In my case, it reported that my audio device was causing the issue. The message was "An audio stream is currently in use." This could be caused by something as simple as a web browse that has some Flash content in it. See screenshot...

So now that you know what is preventing Sleep mode, you need to tell the power management system to ignore that device and go ahead and enter Sleep mode anyway. In my case, it was my audio card called "High Definition Audio Device". Yours will vary - it might mention Creative Labs, SoundMax, RealTek, etc. Or it might be a totally different device all together (network card, mouse, keyboard, etc.). You'll need to specify that exact same name in the following command.
For me, the command was: powercfg -REQUESTSOVERRIDE DRIVER "High Definition Audio Device" SYSTEM
Now that I've told the power management system to ignore any audio streams opened by that device, it goes to sleep without any problems.
(If this helps to solve your issue, why not throw me a bone and click on an ad or two? Thanks!)
(If this helps to solve your issue, why not throw me a bone and click on an ad or two? Thanks!)
May 24, 2012
Duplicate text and SMS messages on Blackberry
One of my users recently started having a problem with receiving duplicate text (or SMS) messages on his Blackberry. This would happen to the majority of messages he received, but not all of them. And some would only have one duplicate message but others might eventually have 5 or 6 copies of the same message. Sometimes the duplicates would show up with different dates as well.
I think something was corrupt with the text message database on his phone so I wanted to wipe out all text messages and see what happened. So I connected his Blackberry to my laptop running the Blackberry Desktop Software and made a full backup of the phone. Then in Blackberry Desktop I went to Device -> Delete Data and selected both "Text" and "SMS" entries just to be sure.
After wiping out those databases, his duplicate text message problems seems to be gone. For now anyway. :)
Lync Online error "There was a problem acquiring a personal certificate required to sign in" - for Office 365
I was attempting to sign into Microsoft Lync Online the other day (part of an Office 365 implementation) and I received this error message...
"Cannot sign in to Lync. There was a problem acquiring a personal certificate required to sign in".


Of course I tried all of the typical stuff - restarting Lync, rebooting the laptop but it didn't help. No other users were reporting this issue - they could all sign in just fine - so I'm assuming it's something local to my Windows 7 64 bit laptop.
I did some research and it looks like something was corrupt with my local cached credentials. Not sure why - i didn't change my password or anything like that. I found this article from Microsoft...
Here are the steps from that article that worked for me...
To renew a user account certificate, follow these steps:
- Renew the certificate in Windows Certificate Manager. To do this, follow these steps:
- Open Windows Certificate Manager. To do this, click Start, click Run, type certmgr.msc, and then click OK.
- Expand Personal, and then expand Certificates.
- Sort by the Issued By column, and then look for a certificate that is issued by Communications Server.
- Verify that the certificate is present and that it is not expired.
- Delete the certificate and try to sign in to Lync Online. If you cannot sign in to Lync Online, go to step 2.
- If you are running Windows 7, remove the user’s stored credentials in Windows Credential Manager. To do this, follow these steps:
- Click Start, click Control Panel, and then click Credential Manager.
- Locate the set of credentials that is used to connect to Lync Online.
- Expand the set of credentials, and then select Remove from Vault.
- Try to sign in to Lync Online again, and then type your new set of credentials.
Mar 2, 2012
Can't see meetings on Outlook 2010 calendar - missing from monthly view
I had an Outlook 2010 user the other day that said their meetings were not showing up in their calendar - even if they were the person that created the meeting request. If they made a regular "appointment" it was fine, but a "meeting" would not show up.
We did notice that the meetings showed up if we went to daily or weekly view. So I figured it was some sort of filter on the monthly view. Then I noticed the "down arrow" icon underneath the "Month" button. When you click that down arrow you see three options - Show Low Detail, Show Medium Detail, Show High Detail. In this case, it was set on Show Low Detail for whatever reason. When I changed it to Show High Detail, all of the meetings became visible on the month view calendar. See screenshot below... (If this post helps you out, do me a favor and click on an ad or two to support this site! Thank you!!)

We did notice that the meetings showed up if we went to daily or weekly view. So I figured it was some sort of filter on the monthly view. Then I noticed the "down arrow" icon underneath the "Month" button. When you click that down arrow you see three options - Show Low Detail, Show Medium Detail, Show High Detail. In this case, it was set on Show Low Detail for whatever reason. When I changed it to Show High Detail, all of the meetings became visible on the month view calendar. See screenshot below... (If this post helps you out, do me a favor and click on an ad or two to support this site! Thank you!!)
Feb 29, 2012
Virtualize Windows 8: How to set up the Consumer Preview in VirtualBox | ZDNet
I'm currently downloading the new Windows 8 Consumer Preview. I want to run it as a VM using VirtualBox. I'm going to try out the guidelines from this article...
'via Blog this'
Blackberry not displaying emails only showing text SMS messages in Messages app
Yesterday I had a customer that said they were not able to read their emails on their Blackberry. (Not sure which model - I think it was some flavor of a Bold, running version 6.x of the OS. It's synced to a corporate BIS server.)
When I hit the "Messages" app, it only showed a few text messages and maybe voice mails. But on the home screen, I did see the little yellow envelope, indicating that there were emails to be read. In fact, if I scrolled up on the home screen and clicked on the yellow message icon area, it pulled up a different window where it breaks down unread emails, unread texts, etc. So I knew the emails were on there somewhere. I just figured they were being hidden or filtered from the Messages app.
Another way that I realized that things were messed up was when I went into Messages -> Blackberry button -> Options, I didn't see the normal looking screen here. It should have different sub-menus for customization which items should be displayed in Messages and many other display options. All I saw were a few options about displaying text/sms messages.
So it was determined that my messages database was corrupt. I used the sync cable and connected it to my laptop which was running the Blackberry Desktop software. First I made a full backup of everything. Then I went to Device -> Delete Data... and told it to delete "Messages". It makes an additional backup of just the Messages database so keep note of this file name and location, you'll need it later. After I deleted the messages database, I did a full reboot by pulling out the battery and putting it back in.
After the phone started up, I went to Messages -> Blackberry button -> Options and I could see all of the proper settings and sub-menus were back. So then I connected back to my laptop via sync cable, went to Blackberry Desktop, went to Restore and then restored the messages database back that I had previously noted. This brought back all of the emails. They now showed up properly in the Messages app along with missed calls, text messages, voicemails, etc.
Feb 28, 2012
A good, free partition tool to resize and merge Windows partitions - EaseUS Partition Master
The other day I ran into an issue where a customer was getting a warning that the C:\ drive was full on their somewhat new Dell Inspiron laptop. Turns out that for some reason the factory had partitioned the drive into a 60GB C:\ drive and a 180GB D:\ drive. So there C:\ drive WAS nearly full but they had plenty of space available on D:\. They didn't have any personal files on D:\, it just looked like various folders created by the system.
So what I wanted to do was allocate some of that free space on D:\ and make use of it on C:\. I could have possibly deleted the D:\ partition but that may have caused some issues since the system was obviously writing some things there already. Alternatively I could have tried to redirect the users folders (documents, pictures, music, etc.) to the D:\ drive but I needed to keep this particular laptop very simple and I didn't want to confuse matters with some files being stored on a different drive, etc.
I decided that what I really wanted to do was to shrink the massive D:\ drive down and then allocate that free space to the C:\ drive. I wasn't sure if I could do that with the built in disk management tools in Windows 7 but I wanted to give it a try. I first went into Disk Manager, found the primary disk, right-clicked on the D:\ partition and I WAS able to shrink it. Sweet. Now it showed a big block of unallocated space to the right of D:\. I now wanted to expand C: but when I right-clicked on C:\, all of those options were grayed out.
After some research, I found that Windows 7 Disk Management will only allow you to expand a partition into unallocated space if the free space is sitting to the immediate right of the current partition. Currently my disk map looked like this - System Partition -> C: -> D: -> Unallocated Space.
I found some recommendations to try out EaseUS Partition Master free home edition. It has several features including merging and resizing partitions. You can see some screenshots here. Basically you can drag some handles to resize your partitions. Initially I ended up in the same stuck situation. I dragged the handles to shrink my D:\ drive but I ended up with unallocated space to the right of the D:\ drive and this tool was still unable to either expand C:\ into the free space or merge C:\ and the free space. I discovered that it has the same limitation that it can only grow a partition into unallocated space if that space is immediately to the right of the partition.
However once I figured this out, it was very easy to work around it. Partition Master lets you shrink the partitions from either the right side OR the left side (keep picturing the disc map in your head). I tried again to resize my D:\ drive but this time, I grabbed the handle on the left side and dragged it to the right. See screenshot below...
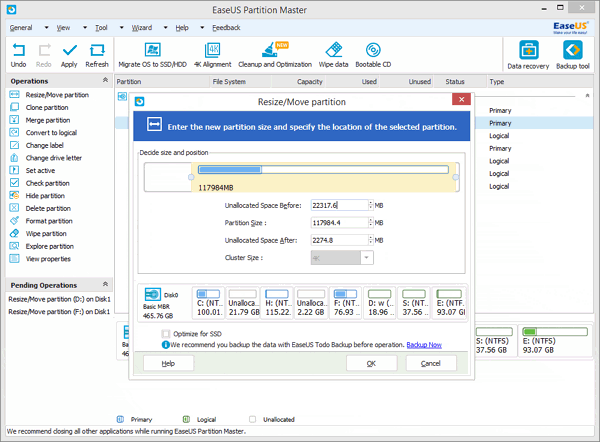
Since I did the D:\ resizing by dragging from the right to the left, this actually created unallocated space IN BETWEEN C: and D:, meaning that I should now be able to expand C: finally!
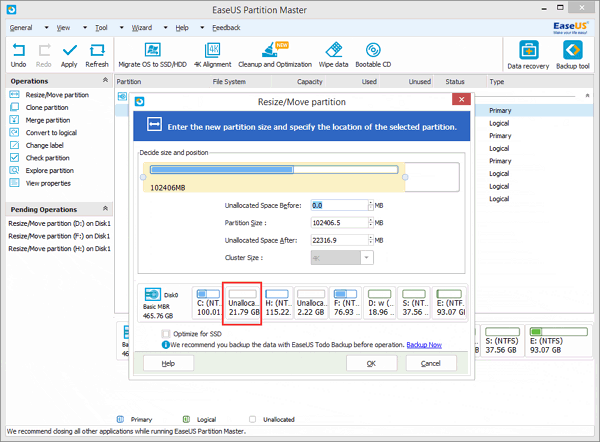
The screenshot below shows the user grabbing the handle on the C: partition and dragging it to the right, to expand the partition into the free space. (After each of these resizing operations, it does need to reboot and it does all of the disk-related tasks in a special boot environment. This process was pretty quick in my case. Maybe 20 minutes.) I now had plenty of room on the 180GB C: partition.
So definitely check out EaseUS Partition Master if you need a simple tool to work with Windows 7 partitions and the built in Disk Manager isn't working for you.
So what I wanted to do was allocate some of that free space on D:\ and make use of it on C:\. I could have possibly deleted the D:\ partition but that may have caused some issues since the system was obviously writing some things there already. Alternatively I could have tried to redirect the users folders (documents, pictures, music, etc.) to the D:\ drive but I needed to keep this particular laptop very simple and I didn't want to confuse matters with some files being stored on a different drive, etc.
I decided that what I really wanted to do was to shrink the massive D:\ drive down and then allocate that free space to the C:\ drive. I wasn't sure if I could do that with the built in disk management tools in Windows 7 but I wanted to give it a try. I first went into Disk Manager, found the primary disk, right-clicked on the D:\ partition and I WAS able to shrink it. Sweet. Now it showed a big block of unallocated space to the right of D:\. I now wanted to expand C: but when I right-clicked on C:\, all of those options were grayed out.
After some research, I found that Windows 7 Disk Management will only allow you to expand a partition into unallocated space if the free space is sitting to the immediate right of the current partition. Currently my disk map looked like this - System Partition -> C: -> D: -> Unallocated Space.
I found some recommendations to try out EaseUS Partition Master free home edition. It has several features including merging and resizing partitions. You can see some screenshots here. Basically you can drag some handles to resize your partitions. Initially I ended up in the same stuck situation. I dragged the handles to shrink my D:\ drive but I ended up with unallocated space to the right of the D:\ drive and this tool was still unable to either expand C:\ into the free space or merge C:\ and the free space. I discovered that it has the same limitation that it can only grow a partition into unallocated space if that space is immediately to the right of the partition.
However once I figured this out, it was very easy to work around it. Partition Master lets you shrink the partitions from either the right side OR the left side (keep picturing the disc map in your head). I tried again to resize my D:\ drive but this time, I grabbed the handle on the left side and dragged it to the right. See screenshot below...
Since I did the D:\ resizing by dragging from the right to the left, this actually created unallocated space IN BETWEEN C: and D:, meaning that I should now be able to expand C: finally!
The screenshot below shows the user grabbing the handle on the C: partition and dragging it to the right, to expand the partition into the free space. (After each of these resizing operations, it does need to reboot and it does all of the disk-related tasks in a special boot environment. This process was pretty quick in my case. Maybe 20 minutes.) I now had plenty of room on the 180GB C: partition.
So definitely check out EaseUS Partition Master if you need a simple tool to work with Windows 7 partitions and the built in Disk Manager isn't working for you.
Feb 20, 2012
Test post from Blogger app for iPhone
Just trying out the Blogger iPhone app. Seems pretty basic. I don't see any way to format text or add a hyperlink. But you can add pictures from your iPhone photo library. And you can add labels/tags to the post.
iPhone or iPad App Store list of updates aren't visible. Screen is blank. Can't install updates.
Sometimes when I launch the App Store app on my iPhone 4 with iOS 5.0.1, I'll get the little red indicator showing that there are updates available for my apps on the Updates tab but when I go to that tab, the screen is blank. It doesn't show the updates.
I haven't found a really good fix yet but for a workaround, I just hit the home button to close the Apps Store app and then double-click the home button to pull up the task bar that shows the currently running apps.
You should see App Store sitting there since you just opened it. Press and hold on the icon for App Store. It will start to jiggle and you'll see a red circle with a minus sign. Click on the red circle. This will kill the App Store app. Now hit home again to stop the jiggling. Hit home one more time to return to the regular screen. Now launch the App Store app and you should see your available updates and should be able to install them.
iTunes error "This computer is no longer authorized for apps that are installed on the iPhone. Would you like to authorize this computer for items purchased from the iTunes Store?"
I ran into this issue with my iPhone 4 running IOS 5.0.1. I plugged my iPhone into my Windows 7 PC to sync with iTunes and half way through the sync process a message popped up and said "This computer is no longer authorized for apps that are installed on the iPhone "Jason's iPhone". Would you like to authorize this computer for items purchased from the iTunes Store?" Then it says "If you do not authorize this computer, the app E*Trade Mobile" (and 3 other apps) and it's data will be deleted from this iPhone."
Then is gives me buttons for Authorize, Don't Authorize or Cancel. I didn't want to simply hit Authorize, because as you may know, you are only allowed to have 5 computers authorized for any particular iTunes account. And since this was the only PC that I use iTunes on, something was clearly wrong and I didn't want to waste one of my authorizations. I'd rather fix the actual problem. So I hit the Cancel button on the error.
You could first have a look at this article from Apple, but it didn't really help in my case. http://support.apple.com/kb/TS1389
My guess is that it is related to the fact that I ended up with two different iTunes accounts because I was a Mobile Me customer. I've had an iTunes account for a couple years and then I signed up for Mobile Me account (the predicesor to iCloud) and created a new account with an @me.com address. Then when Mobile Me merged into iCloud last year, the @me.com account also became an iTunes account. So now I've got two iTunes accounts and Apple doesn't provide any way to merge these into one.
So it turns out that I had downloaded a few apps onto my iPhone using the @me.com account without really thinking about the consequences. It looks like this decision is finally catching up to me.
So I went back to my iPhone and deleted the first app that the error mentioned - E*Trade Mobile. Then I started the sync process again in iTunes. The same error came up and mentioned a different app this time, because E*Trade Mobile was gone. I hit Cancel again and then deleted the app that it mentioned from my iPhone. I repeated this process 4 more times until I had deleted all of the apps on my phone that were mentioned in the error message. I'm assuming these were the few apps I had downloaded to the iPhone using the @me.com account instead of my normal iTunes account.
Then it was able to sync without any issues. And I had made a list of the apps that I deleted so I simply re-installed them using the proper iTunes account.
If this post helped you out, it would be great if you would click on an ad or two. Thanks!!
iPad or iPhone home button becomes sluggish or doesn't respond. How to fix!
I read a tip the other day that is suppose to restore "home" button on your iPhone, iPad, or iPod Touch back to normal working condition, should it ever become hard to press or slow to respond to your double-clicks, etc.
- Launch an Apple default app such as the "Stocks" app.
- Hold in the power button on the top edge of your device until you see the "Slide to power off" screen. Then let go of the power button.
- Now hold down the home button and it will kill the Stocks app and the "Slide to power off" screen will disappear.
Apparently this is supposed to somehow reset or re-calibrate the home button. My home button was already working fine so I can't say if it works or not. Though many other folks have said that this DOES work. Let me know!
Jan 24, 2012
Office 365 password expired - How to disable 90 day password expiration
I ran into an issue with my first Microsoft Office 365 cloud hosted deployment. I went to go log in as the administrator to work on an issue and I found that my password had expired. I then discovered that by default, all user passwords are set to expire every 90 days. If you don't want such a policy, it IS possible to disable. Though you won't find the settings anywhere in the Admin portal GUI. You'll need to use some PowerShell scripts.
You'll need a few tools installed on your workstation in order to get Powershell working.
Microsoft Online Services Sign-In Assistant
32-bit download
64-bit download
Microsoft Online Services Module for Windows PowerShell
32-bit download
64-bit download
Now that you have the tools in place, launch PowerShell but going to Start -> All Programs -> Microsoft Online Services -> Microsoft Online Services Module for Windows PowerShell.
Now to you need connect and log in to your Office 365 account with PowerShell. Type the following command in the PowerShell window...
Connect-MsolService
Then you'll see a login window. Enter your Office 365 username and password.
Now you can disable the password expiration for all users in your Office 365 domain with this command...
Get-MSOLUser | Set-MsolUser -PasswordNeverExpires $true
If you'd like to make the change for just a single user, you can use the script below (replacing user@mydomain.com with the proper user's email address.)
Set-MsolUser -UserPrincipalName user@mydomain.com -PasswordNeverExpires $true
You won't get any confirmation or anything, but as long as PowerShell doesn't give you an error, then you've done it correct.
Update : One important thing I've discovered is that this script doesn't disable the password expiration for the entire system once and for all - it's only disabling it for the user(s) that you specify that exist right now. So if you create a new user tomorrow, I believe that users password will expire in 90 days by default. So you'll need to run this script each time you create a new user account!
Subscribe to:
Posts (Atom)